Don’t want the windows
default drive icon of local drives (hard drive partitions,say for example: D:
Drive), CD drives, or pen drives??? You may change it to your favourite icon. Today’s
post is on how to change windows drive icons? This trick works fine on Windows XP, Vista, 7, 8. You just need to follow 5 short
and simple steps.
Step 1: Choose an icon
Select the icon you wish
to assign to a particular drive. Now copy the icon and paste it that drive
(i.e. C:, D:, E:, and so on ).Make sure the icon have .ico file extension only,
if it is .png, .bmp or any other image format then this trick won’t work. Rename the icon name with daya.
Step 2: Open Notepad
You can do this by holding Windows
key and pressing letter “R”, the Run dialog box appears. Type in the
textbox notepad and press Enter key.
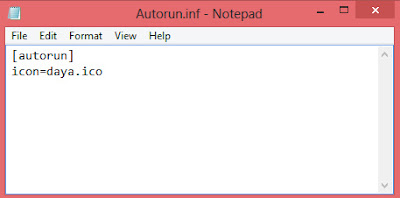
In notepad paste the below code:
[autorun]
icon=daya.ico
Step 3: Save the file as Autorun.inf
After writing those two lines
save this notepad with the name autorun.inf.

Step 4: Hide the files
Hide both these files the icon
and Autorun.inf, using command prompt so that these files cannot be deleted
accidentally.
Suppose
you want to hide the following files in D: drive
Follow
these steps:
- Holding Windows key and pressing letter “R”, the Run dialog box appears. Type in the textbox cmd and press Enter key.
- The Command prompt window appears.
- Navigate to D: drive
- write attrib +s +h Autorun.inf
- Press Enter
- write attrib +s +h daya.ico
- Press Enter
Again if you want to view or
modify the files then write Minus (-) in place of + sign.
Step 5: Restart the computer
Now restart the computer, and
the drive icon will be changed. I hope this trick helps you.
This trick was how to change windows
drive icons? But what if you want to set your own picture as the drive icon??
But remember that you can’t set an image file(.jpg, .png, .jpeg, .gif., etc) as
an icon, I have a solution to this. To know how to set picture as a driveicon click here.


No comments:
Post a Comment